Editing on your Android smartphone with PowerDirector

PowerDirector is one of the best apps for editing video on your Android smartphone. Here's a step-by-step guide.
PowerDirector is free to download from Google Play, but comes with a burnt-in logo and some in-app advertising.
To get rid of the logo and the ads, upgrade to the paid-for version.
Click on the logo itself and you get tariff info (for example: €4.89 per month or €33.99 for a full year). It's good value for money if you're going to be editing regularly: the price of two cups of coffee a month!
The screen shots below come from a Samsung 8 Plus, using the free version of PowerDirector.
Two quick tips to start:
Lay your smartphone flat on the table to edit. It’s much more comfortable that way.
When you use Power Director for the first time, links to hints and tips will appear on screen. Tap the screen and they go away. Uncheck the tick box so they don’t reappear.
TO START A NEW PROJECT
Click on the Power Director clapperboard icon in the middle of screen. Ignore the advert next to it

Give your project a name. Select aspect ratio: 16:9 for horizontal video or 9:16 for vertical video.

You are then taken to the import video screen where your raw material is displayed.

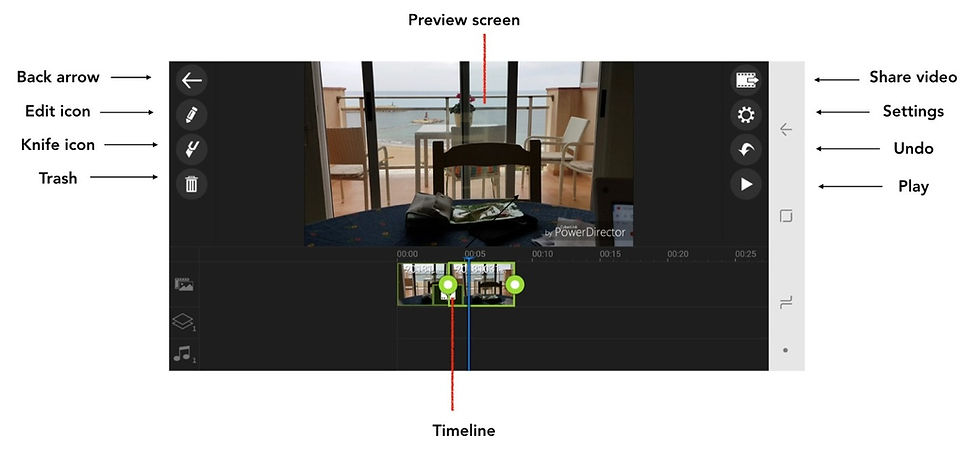
The Timeline with the blue vertical bar is at the bottom. It's where all your editing happens.
Hit back arrow top left to go to main edit screen
FINDING YOUR WAY AROUND THE POWERDIRECTOR SCREEN
TIP: your best friends are the Undo button and Back Arrow. If you get lost or make a mistake, tap either one to get back to where you want to be.

STARTING YOUR EDIT
TIP: before you begin your edit, organise all the video clips for a specific project into one folder in your gallery. It'll make finding your clips much easier. To do this, go to your gallery, tap on all the clips from your shoot, then tap the 3 dots at top right of screen. Tap MOVE TO ALBUM, tap CREATE ALBUM and name it, tap CREATE.
To begin, tap the Import Media icon. This takes you to the import screen (below). Make sure the video icon is selected at the top of screen.


Tap on Camera and your video clips will appear (above) Tap the clip that you want; it highlights in blue with a circled cross (see above). Tap the play arrow to preview your footage. Tap selected video again and it will drop to the timeline.
Hit back arrow, top left, twice to get to timeline screen
Pinch video with your fingers to expand or contract it on the timeline.
TIP: for more accurate editing, always expand the clip with thumb and forefinger to give yourself more room to work, otherwise the timeline can be very cramped on a small smartphone screen. You can pinch or expand below the clip wherever there is black space on the timeline.
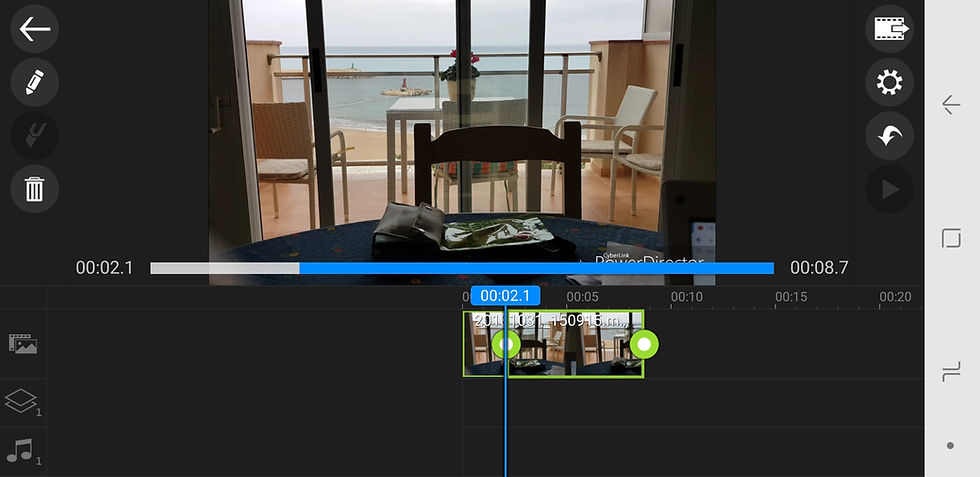
Move the clip left and right on your timeline to review footage. As you tap the clip, it highlights in green, with green buttons at either end
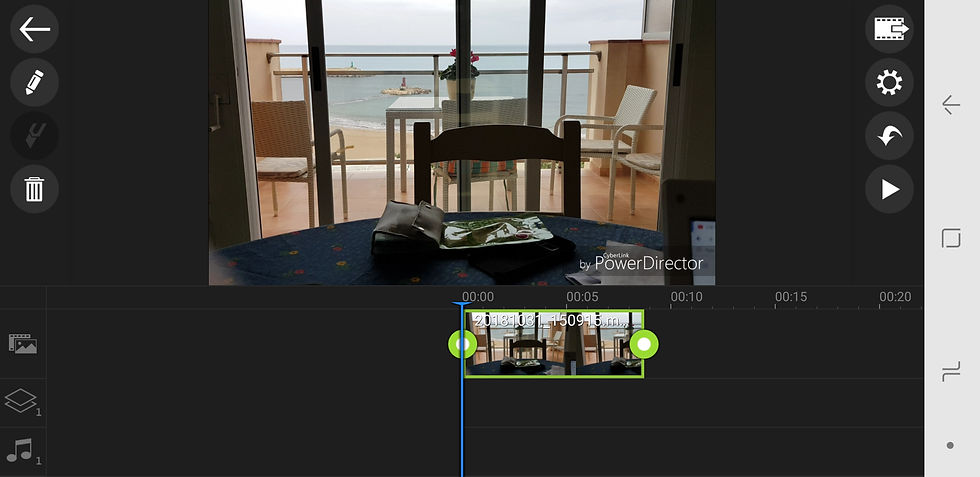
To edit the clip duration, tap and hold either green button and move left or right until you are happy. The duration is displayed just above the timeline
To split the clip, tap the clip to highlight it, and a knife icon appears, just above the trash icon, left of screen (see pic below). Place the blue line where you want to split your clip and tap the knife icon. The video splits.
To cut out a section of video, position the blue line at the start of the section you want to remove and tap on the knife icon. Then move the blue line to the end of the section and tap the knife icon again. Tap the section between the two cuts to highlight. Hit the trash icon and the section disappears.
You can move a section and re-position it anywhere in your video by tapping and holding it…it turns orange. Drag it with your finger and release to drop it into its new position on the timeline.
TO ADD EXTRA CLIPS
Tap the video import icon, select video as before, and the new clip will drop onto your timeline at the end of your previous clip. Build your video by laying one clip after another on the timeline until your item is complete.
TO ADD EXTRA VIDEO CLIPS, STILLS, STICKER OR TEXT BOX AS A CUTAWAY
Tap the layers icon (ringed in blue below) and select from video, still, text or sticker. Selecting video takes you back to the import screen. Highlight the clip you want, tap, and it will appear underneath your main clip

Tap the back button a couple of times to take you back to the main edit screen.

Highlight your new clip and it will appear as a 'picture in picture' on the main screen. You can move the clip around the screen and leave it as picture in picture, or expand it by dragging the corners to fill the screen completely.
You can edit it in the same way as your main video clip…tap to highlight it and the handles appear in blue rather than green.
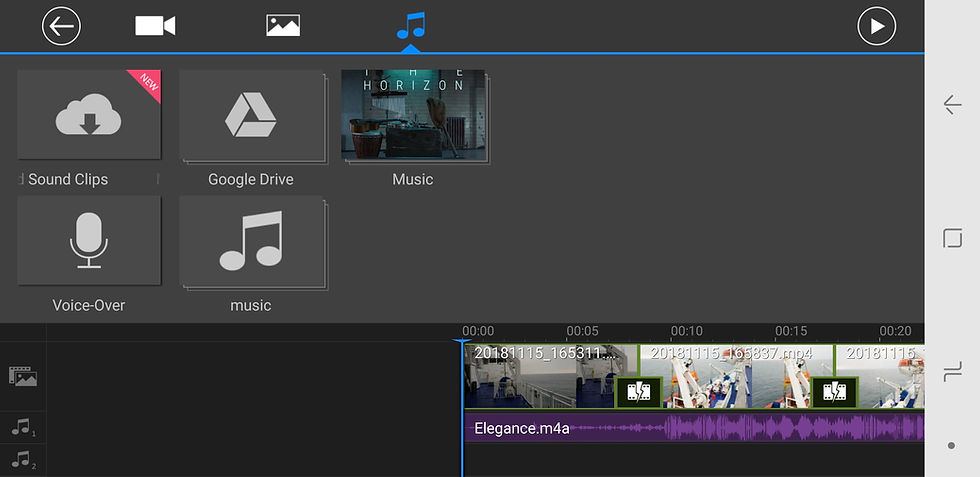
TO ADD MUSIC
Tap video import button, select music icon.

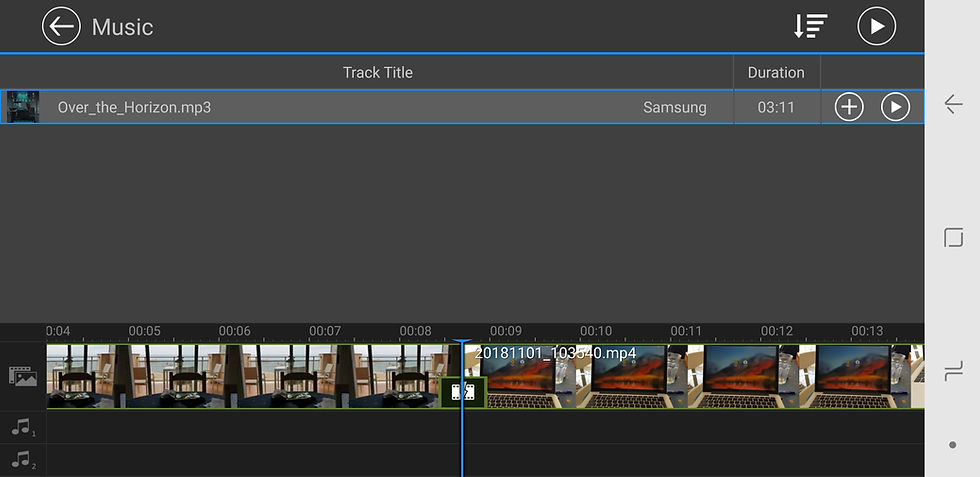
Highlight the track you want. Tap the cross in a circle icon and it will drop into place where your blue timeline marker is.

A music track appears as a purple line with purple handles. You can edit it in the same way as a video clip.
TO ADD TEXT
Tap the layers icon (ringed in blue), then select Title. This brings up a limited selection of around 20 basic title templates. You can purchase more options.

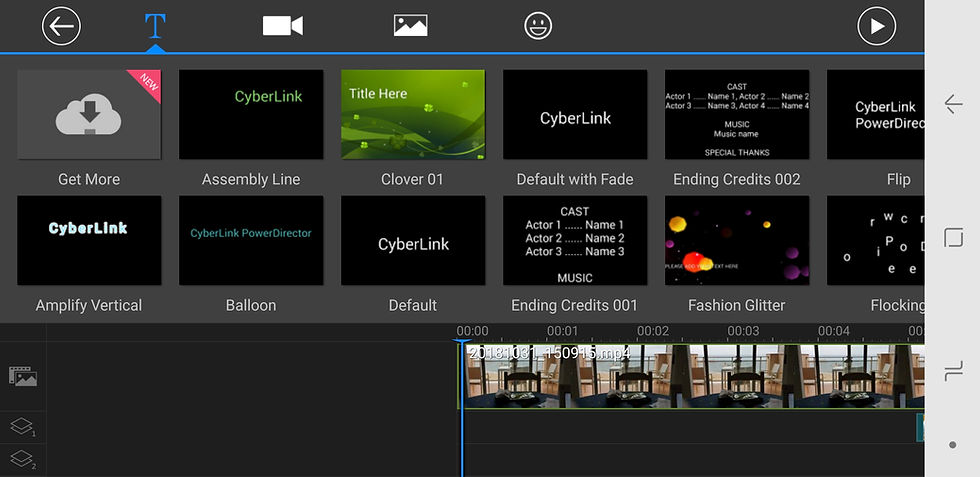
Select the titles template that you want. Tap the text on screen to edit the words you want.

For more options, click on the pencil (aka edit) icon below the back arrow (top left) to bring up a selection of fonts and colours, control the opacity, justify text, or select bold/italics

Can drag your text box around screen and make it bigger/smaller by pinching.
Text options in PowerDirector are better than in iMovie for IOS.
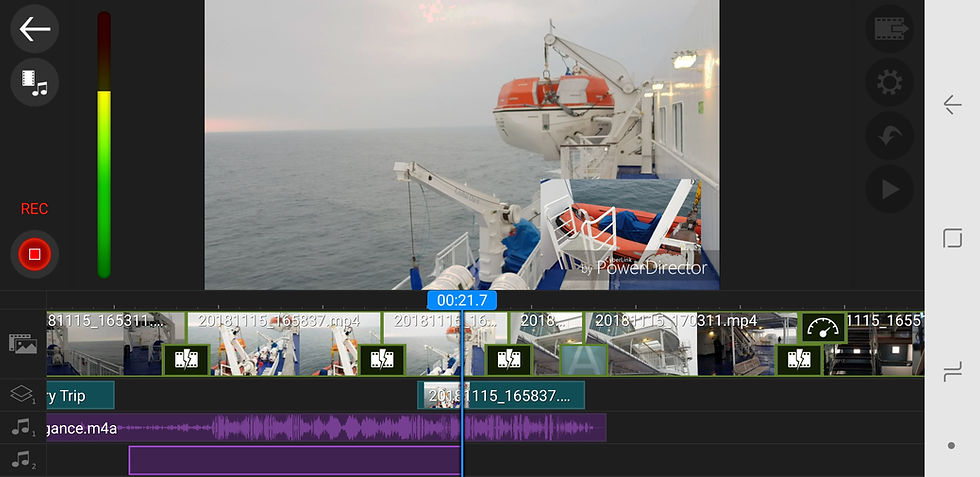
TO ADD A VOICE OVER
To add your own commentary to your video, tap the Import Media icon, then select the audio 'quaver' icon (highlighted in blue below), then select Voice-Over.
Position your blue timeline marker where you want your commentary to start. Tap the red REC button, left of screen (below)

You will be asked to select which audio track you wish to use. If you have no other audio track laid on your timeline, choose 'The first audio track'.
If you already have an audio track on there (in the screenshot above, there's already music on track one) then select 'The second audio track'.

Start recording your voice over, and it will appear as a purple line below your video (see below).
To make sure your voice stands out, you may want to alter the levels of other audio in your project (for example, the music). PowerDirector has an audio mixer for this; see the AUDIO section later in this tutorial.
TIP: for professional results, always use an external microphone to record your voice: even the microphone on your earphones will deliver a better result.
FURTHER EDIT OPTIONS
Click on the pencil or edit icon (ringed in blue) and a range of options appears:

Volume: see section on audio below
Flip: self explanatory!
Reverse (reverses the motion in selected video clip)
Speed: speed up for a timelapse effect, slow down for a slomo
Duplicate: duplicates clip
Crop: crops picture
Colour: for improving the colours on your video clips
Rotate: rotates picture 90 degrees with each tap
Skin Smoothener: to improve face shots,

SPEED ICON: tapping the speed icon brings up this screen (above): move the slider up to increase the speed of the clip. The speed is displayed on screen (1.25X on this occasion). Move the slider down to slow the movement in your clip.

The Skin Smoothener icon brings up two sliders (above) for Skin Brightness and Skin Smoothness
TRANSITIONS
Transitions are effects which sit between adjoining clips of video. The default transition in PowerDirector is a straightforward cut between one clip and another, but you can choose a different style. Tap on the transition icon (ringed in red below).

This menu of different effects appears (below). Tap to select the effect you want, tap the play button to preview it. Once you're happy, tap the cross + circle icon and the new transition drops onto your timeline.

AUDIO
To increase/lower the volume on a specific clip, go to your timeline and highlight the section of video you want to work with.
Tap the pencil/edit icon, then tap the speaker icon and the Audio Configuration screen appears (below).

Increase or decrease volume via the slider. Tap on Fade In or Fade Out buttons to smooth out your audio start and finish.
For more advanced audio options, tap on AUDIO MIXING (you can also access this audio mixer via the Settings icon second from top, right of screen). This gives you the ability to raise or lower the audio on any of your audio or video tracks to achieve a good, balanced sound mix.

Each slider controls a source of audio (see pic above). From the left: the first slider controls the volume on your main video. The next two sliders allow you to vary the volume on either of your two video layers. The last two allow you to control volume on either of your two music tracks.
Audio Ducking: for more precise 'audio ducking' (for example, to dip the sound level on a music track as a voiceover starts), put a cut in the music track with the knife icon to coincide with the beginning and end of the voiceover. Tap the pencil/edit icon, tap the speaker icon and the Audio Configuration screen appears. Lower the music volume in that section, and tap Fade In and Fade Out for a smooth transition.
TIP: always wear earphones when mixing audio
TO DETACH AUDIO
Sometimes you want to use the audio from one clip to accompany another clip. For example, you may have a lot of wind noise on your main video - let's call this clip 1 - and you want to replace it with a quieter section of sound from a newer clip, which we'll call clip 2.
To do this, you need to detach the audio from clip 2. Tap Layers, select clip 2 from Camera, and it will drop into position below your main video. Tap and hold it and pull gently down with your finger. The audio will detach and become a purple sound track. The video disappears. Now reduce the volume on clip 1 and you're done.
FINISH AND EXPORT EDIT
Tap the export icon top right. Save Project to save video to your Gallery (recommended).

Produce Video brings up a range of export locations for your video:
Facebook
YouTube
CyberLink Cloud (if you have Cyberlink Power Director on your PC, you can continue the edit on that)

The free version will allow HD or SD only (not Full HD or 4K).

Under More Output Options, you can choose to export at 30fps, 60fps or 24fps.
For more info on PowerDirector, check out this really good video tutorial from Justin Brown at Primal Video.
© Guy Pelham Media 2018
Comments